Data List Screen
Clicking the “Data” button takes you to this screen.
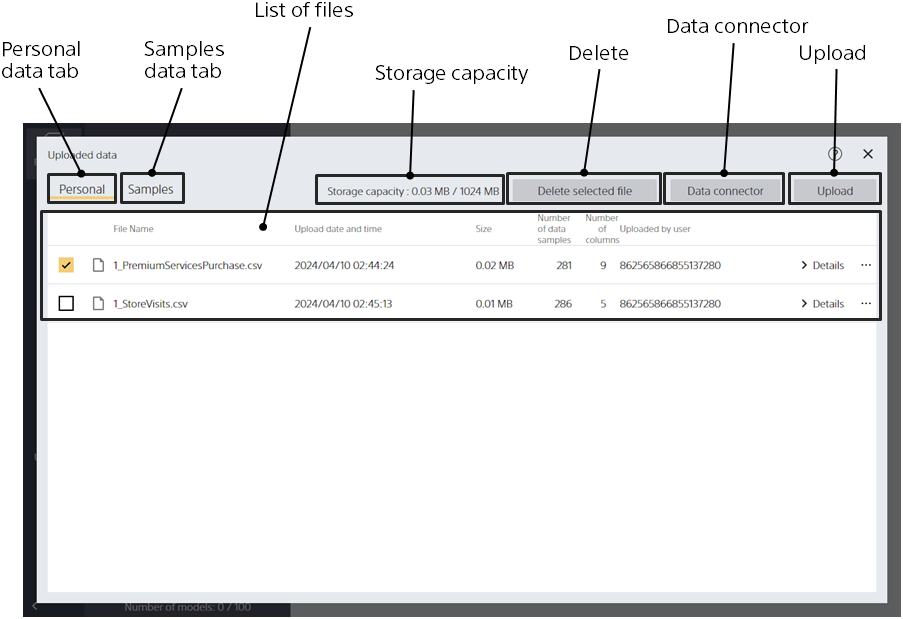
Check file attributes
You can check the attribute information of each uploaded file in the “File List”.
- Filename: File name of the data.
- Date and Time: The date and time the file was uploaded.
- Size: The size of the file. There is an upper limit on the total size of files that can be uploaded.
- Rows: The number of rows of data.
- Columns: The number of columns (variables) in the data.
- Uploaded by: The user who uploaded the file. If there is a nickname setting, the nickname is displayed. If there is no setting, the account ID is displayed.
Preview a file
Step 1. In the [File List], click the [Details] button.
Step 2. Displays the top 10 rows of the file.
Check the storage capacity
There is a fixed limit to the total amount of data that can be uploaded. You can check the limit and the current amount used by looking at “Storage capacity”. Files cannot be uploaded if they exceed the limit. The upper limit is decided for each plan. Personal and shared capacity counts separately.
Switch between tabs of data
The following three data list screens can be switched by the tabs.
- Personal: This screen lists personal data. Data that only you can access.
- Shared: A screen that lists data for sharing. Data that can be shared between accounts belonging to the same tenant (group). The free trial version doesn’t offer data sharing, so you won’t see a sharing tab.
- Sample: Sample data for use in the tutorial.
Upload a file
Step 1. Click the [Upload] button.
Step 2. In the window that appears, drag and drop the file you want to upload.
You can also specify a file from the "Select Local File" button. You can upload files in either the csv (comma-delimited) or tsv (tab-delimited) format.Delete an uploaded file
Step 1. In [File List], click the check button for the file you want to delete.
You can select multiple files.
Step 2. Click the [Delete] button
Step 3. Click [Delete] in the dialog box that appears after clicking
Alternatively, you can select “Delete” from the three-point reader at the right end of each file line in the “File List”.
Transfer data from an external service
Step 1. Click [Data connector].
Step 2. In the window that appears, enter the required information for accessing the external service.
Step 3. Click
Step 4. In the window that appears, enter the filename to save as and click [Transfer].
You can transfer files in either the csv (comma-delimited) or tsv (tab-delimited) format.
Copy uploaded Personal files to Shared
Step 1. Select [Copy] from the three-point reader at the right end of the file you want to share in the [File list].
You cannot upload files directly to Shared. Please copy the Personal upload for Shared.
Download an uploaded file
Step 1. In the [File list], select [Download] from the three-point reader at the right end of the file you want to download.
Step 2. It is downloaded in the manner specified by the browser.
Rename a file
Step 1. Click [Rename] from the three-point reader at the right end of each file line in the [File List].
Step 2. In the window that appears, enter the name of the file you want to change and click [Rename].
Creating Models from Uploaded Files
Step 1. In the [File List], select [Create Model] from the three-point reader at the right end of the target file.
Step 2. Proceed to model creation from the displayed model setup screen as usual.